This post may contain affiliate links, which means I earn a small commission if you purchase something I recommend- at no additional cost to you! As an Amazon Associate I earn from qualifying purchases. Thank you for supporting this blog! Full disclosure here.
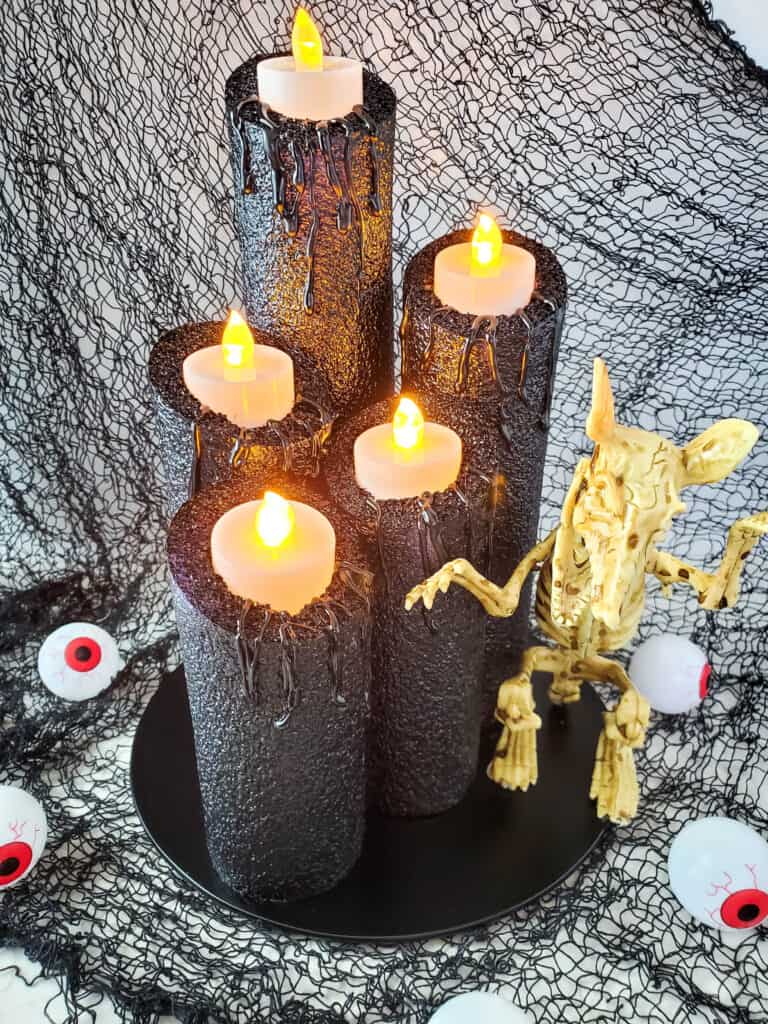
These DIY Halloween pool noodle candles are the perfect way to put those leftover pool noodles to good use after summer ends. Pool noodle halloween candles make super spooky decorations for your halloween party or outdoor decor. Simply follow this easy tutorial to create low cost halloween decor from pool noodles!
Halloween decorations can be expensive, especially large outdoor or lawn decor. If you’re looking for some budget friendly decoration ideas for spooky season, you’ll love these DIY halloween candles.
This easy halloween DIY is so much fun to make and uses affordable items that can all be found at your local dollar store. Even if you’ve never created your own DIY halloween decor before, these DIY pool noodle candles are an easy hack that will have you feeling like you can tackle any DIY project!
Grab your pool noodles and your family and friends for an afternoon of crafting fun and let’s make some spooky DIY halloween pool noodle candles.

How to Make DIY Halloween Pool Noodle Candles
This halloween pool noodle project is a lot of fun! Use your pool noodle candles as halloween decor for years to come, or as a spooky craft project with your friends and family. We love how this DIY hack uses pool noodles which are often leftover or discarded as the summer months fade away.
It’s a great way to recycle pool noodle pieces, while also saving money on your halloween decorations!
NOTE: You can buy the pool noodle, round trivet, glue sticks, and flameless candles at Dollar Tree or any dollar store.

Supplies Needed
- 1 pool noodle
- Sharp knife (I just used a kitchen knife, but you could use a utility knife)
- Hot glue gun
- Glue sticks
- Round trivet or cake board
- Black spray paint or other black paint
- 5 flameless candles (tea lights)
Pool Noodle Halloween Candle Directions
Step 1: Start by cutting your pool noodle. You will make your very first cut at an angle. Then the next cut will be straight, the next at an angle etc. You will want to cut your pool noodle into 5 pieces, all various heights. You may have some pool noodle leftover, which you will just discard.

Step 2: Next, you will cut out a section in the middle of each piece, on the angle end (this will be the top). This section will need to be wide enough for your candle to fit into snuggly.

Step 3: Apply hot glue to the flat side (bottom) of the longest piece of pool noodle. Glue this to the trivet, just off of one edge.

Step 4: Repeat the step above, arranging all of the pool noodles onto the trivet. You will have some space left on the side if you arrange like us, which is perfect for setting a fun little skeleton rat creature, or other Halloween decoration.

Step 5: Now, use the hot glue gun to make “wax drips” around the top of each candle and dripping about a quarter to one third of the way down. Once painted this will look like melted wax.

Step 6: Next, you will spray paint the entire project. Allow the paint to dry, then check to see if you need to do a second coat.

Step 7: Once your project paint is completely dry, that’s when you will insert the candles into the tops of the “candle sticks”.

Variations
- LED candles– If you want your pool noodle candles to burn brighter, try using led lights instead of the tea lights from the dollar store. LED lights will be a little bit more cost wise, but they are an easy way to make your pool noodle candles stand out if you are planning to use them outside or on the porch by the front door.
- Candle arrangement– You can create your own unique look by testing different sizes and different lengths of the pool noodles. You can also add other decor in front and around the candles like a large skull, bats, or witches cauldron.
- Floating Candles– Use fishing line to hang your pool noodle candles from your trees in the front yard. They will give an eerie glow as you welcome trick or treaters.

More Easy Pool Noodle DIY Projects
- Pool noodle birthday candle: You can create this same craft project using white paint or other fun colors to make giant birthday candles to celebrate your kid’s birthdays! They will love waking up to giant candles in their living room or front yard.
- Lightsaber pool noodle halloween hacks: Another fun way to use leftover or damaged pool noodles from summer is to turn them into lightsabers for your child’s halloween costume.
- Horse pool noodle halloween hacks: Turn your little one into a cowboy and create a horse out of your old pool noodle with this tutorial.
Looking for more ways to use pool noodles for Halloween crafts and decorations? Check out this post here!

Conclusion
Halloween decorations can be really expensive if you’re on a tight budget! Especially large halloween decor for your front yard or home. That’s why I’m always looking for fun ways to create our own halloween decorations from dollar store items or recycled containers.
These DIY Halloween pool noodle candles are the perfect mix of dollar store and recycled materials. If you have a pool or frequent the lake or ocean often, you might already have pool noodles wasting away in your garage that would be perfect for this project.
Give your old pool noodles a new life by creating these adorably spooky candles out of them! It’s not as difficult as it looks, and with our easy DIY tutorial, you’ll have these pool noodle candles ready to decorate your home or yard by the end of the day.

More easy Halloween DIY projects
- Spooky Halloween DIY Lawn Decorations
- DIY $4 Halloween Witch Wreath
- Bat Wreath $3 DIY for Halloween
- Halloween Play Dough DIY
- DIY Halloween Decor Ideas
- Kid Costumes for Halloween DIY Ideas
- Halloween Pumpkin Upcycle DIY for Kids
- DIY Halloween Spider Craft
- Disney Pumpkin Painting Ideas
- DIY Pumpkin Decor Ideas
What do you think about these spooky DIY halloween pool noodle candles for your home or front yard this season? I’m excited to see if you give it a try!
Let me know if you created your own pool noodle candles, and if you post a picture of your completed project on social media, tag me @makingfrugalfun. I can’t wait to see your final projects.
DIY Halloween Pool Noodle Candles

These easy DIY halloween pool noodle candles will be your favorite spooky decorations this year!
Materials
- 1 pool noodle
- Sharp knife (I just used a kitchen knife, but you could use a utility knife)
- Hot glue gun
- Glue sticks
- Round trivet
- Black spray paint
- 5 flameless candles
Instructions
- Start by cutting your pool noodle. You will make your very first cut at an angle. Then the next cut will be straight, the next at an angle etc. You will want to cut your pool noodle into 5 pieces, all different heights. You may have some pool noodle leftover, which you will just discard.
- Next, you will cut out a section in the middle of each piece, on the angle end (this will be the top). This section will need to be wide enough for your candle to fit into snuggly.
- Apply hot glue to the flat side (bottom) of the longest piece of pool noodle. Glue this to the trivet, just off of one edge.
- Repeat the step above, arranging all of the pool noodles onto the trivet. You will have some space left on the side if you arrange like us, which is perfect for setting a fun little skeleton rat creature, or other Halloween decoration.
- Now, use the hot glue gun to make “wax drips” down the “candles”.
- Next, you will spray paint the entire project. Allow the paint to dry, then check to see if you need to do a second coat.
- Once your project paint is completely dry, that’s when you will insert the candles into the tops of the “candle sticks”.
hi! I'm shannon
I’m a wife, mom of three, doctor, and blogger! In 2018, I decided to turn my mom blog, into a personal finance blog so others could follow along on our journey to pay off over HALF a MILLION dollars in student loan and practice start up debt. I hope you enjoy following along, and maybe even find some inspiration along the way.